I Started This Heat Wave (Part 2)
In Part 1 of this earthshaking, dream making, groundbreaking blog duology I explained how temperatures over 90°F (32°c) can affect your watercolor painting. I explored various techniques that can help you watercolor in extreme heat, as well as a number of solutions you can buy to help you in this endeavor. Sadly, all the proposed solutions were outside my budget so I could only discuss options instead of testing them. Happily, this week we are talking about DIY options using common household items! Roll up your sleeves & strap on your safety goggles, Part 2 is all about #WatercolorScience!
You Can DIY A Solution
The internet contains a literally infinite amount of DIY art solutions. Some are sensible, some are ridiculous, & some, like a cat flap, are so ridiculously obvious it takes a real genius to point them out. With a small amount of time for testing I chose to limit my experimentation to 5 DIY solutions in 2 groups.
The Solution is in the Water
These solutions were added to the water I used to coat the paper before painting. I tested adding dish soap, ice, vinegar, & witch hazel. Some are meant to make the paint spread out faster, some are meant to make the paper dry more slowly, & some are meant to do both. The solutions make the paint spread faster by destroying the surface tension of the water. If you follow me on Mastodon, you’ve already seen my post explaining surface tension. If not, here we go!
Liquids like water (or, in the example below, oat milk) have a high surface tension; the molecules hold tightly together. That’s why water can ‘mound up’ over the top of a cup before spilling, & why some insects can walk right across the water’s surface. When you add a solution that lowers surface tension, like dish soap, the water molecules stop holding tightly to each other & instead spread themselves out as much as possible, as seen below!
This is the first video I ever made for this blog. It is truly an historic moment in both scientific & cinematic achievement!
Experiment Time!
I brushed on the solution, then painted a green flower shape using the wet-on-wet technique to see how the paint flow & drying rates were affected over time. Vinegar & witch hazel behaved so similarly I only photographed vinegar’s results. Here are my super science results:
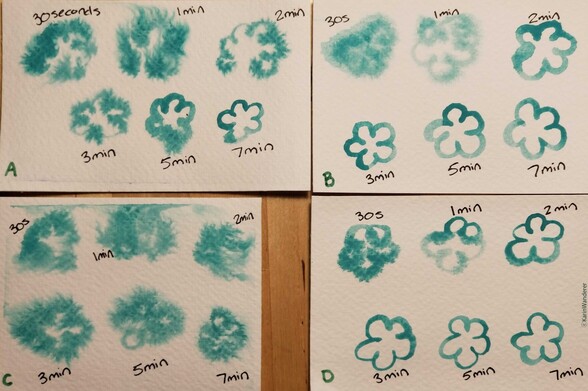
The ‘A’ card is my control- just plain water. On a day over 90°F (32°c), with no fan, it was bone-dry in 7 minutes.
Dish Soap The ‘B’ card was soapy water. As you can see, the paint disperses faster, just like the food coloring in the video above. However, it also dries a lot faster. It hardly blurs from the 3 minute mark on, whereas plain water was blurry past the 5 minute mark. Considering how many claims I saw online about soap slowing drying time, I was surprised!
Ice Cubes The ‘C’ card is for icy water. Cold water evaporates more slowly. It seems so obvious when I say it out loud! I felt genuinely foolish that this had to be pointed out to me- but it works.
Vinegar or Witch Hazel The ‘D’ card is for vinegar, which behaved exactly like witch hazel in that neither worked as intended. The paint dried noticeably faster, even though at this point the temperature had fallen & the humidity had risen slightly! I declare these both to be complete failures.
Winner: Ice water. Who knew?!
The Solution is in the Paint
This was suggested for watercolor paint that comes in a tube instead of pans, so I could only test it with gouache. I mixed the smallest drop of honey I could squeeze out of the bottle with about 4–5 times the amount of paint using an old supermarket rewards card as a palette knife. It mixed up much more easily than expected! That was the last part that went more easily than expected…
Mixing honey with pigments to make paint is old- we have literally found this mixture in cave paintings from Neolithic times. It was also used in Ancient Egyptian paintings & illuminated manuscripts. People still use it to make their paints today! It makes your colors brighter & shinier. If you use a light-color honey it barely affects your colors! I have seen honey that is practically clear that would be perfect for this. I was using black paint for this experiment, so I didn’t worry about the color of honey.
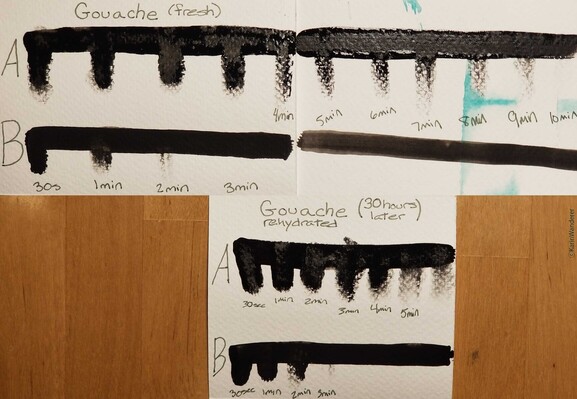
This worked much too well. As you can see from my test papers, there is an enormous difference in drying time between the lines.
Line ‘B’ was plain gouache. Whether used fresh out of the tube or left to dry on a palette & rehydrated, it dries on the page inside of 3 minutes. Honeyed gouache just… doesn’t dry at all. 30 hours after the initial experiment, the gouache on the test paper was still tacky – like it usually feels about 2 minutes after painting. The gouache on my palette was still wet! It was shiny & sticky, like fresh tar on a hot street. I have watched videos of people making paint with honey so I know that works, but adding it to already-mixed paint was not the easy solution I was promised by internet randos.
[Friendly Neighborhood Karin here. 60 hours after mixing honey & paint, all the honeyed paint was still wet. 90 hours after mixing, it was still a bit sticky but dry enough that a sealant spray might have worked. I have no sealant spray & so just threw all the honeyed paintings away.]
Winner: Nobody. Well, maybe the ants who find these honeyed paintings in the trash.
Xtreme Climate Conclusions
I’m so pleased that ice water is the clear winner here. What an easy, inexpensive solution. I’ve started dropping one ice cube into each of my 2 water glasses when I start painting on a hot day. Adding a lot of ice (as I did for the ‘C’ card) means that sometimes a bit of ice can stick to your brush & you end up carrying it to the paper, which messes with your water levels. One cube is plenty. Put the rest of your ice into your drinking water- you need to stay hydrated too!
This multi-part extreme weather blog has been a blast! Thank you to everyone who sent me suggestions. I am spending this week doing a series of free watercolor workshops (made possible in this weather by ice water!) See you next week!
This is an ongoing series of #WatercolorScience articles about how different types of weather affect your painting, even if you work inside.
Extreme Heat & low humidity: We're Having a Heat Wave & I Started This Heat Wave Freezing Temperatures: When Winter Comes Howling In Humidity & Rain: Lost in a Fog
Get my art on mugs & vinyl stickers in my Shop!
Donate to support my works & get cool perks on Ko-Fi
Join us for #ArtABCs, the best art challenge on the internet!
- All pictures posted are my own work.
- All reviews are my own unpaid & unsolicited opinions.